Tag Archives: Large negatives

Shallow depth of field on 5×4

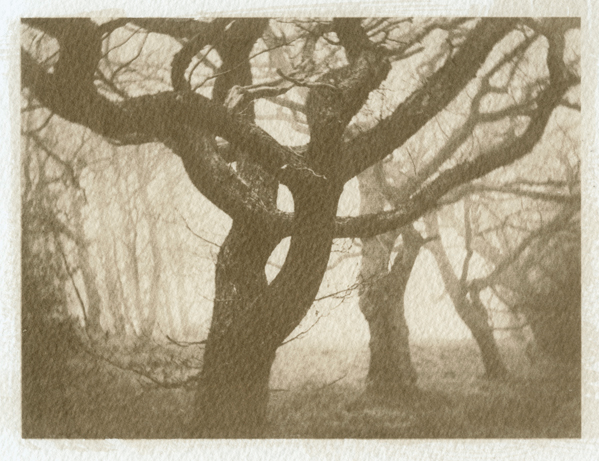
Today I was looking for a lens to put on my MPP 5×4 to shoot a still life in the studio, and I picked out a 150mm f2.8 lens which originally came from a photocopier. The reason I know it’s origins is because about 15 years ago, a slightly eccentric neighbour was breaking up an old photocopier outside my house, so I asked him if he would give me a lens if he found one inside. I got it and I’ve had it sitting in a box of odd lenses and unusual bits of glass since then. Putting it on the camera, I really liked the shallow focus and beautiful soft background, but with a fixed aperture of 2.8, I had to find some way to control the exposure. I decided that some very slow X-Ray film and a diffuser over my tungsten light would give me a manageable exposure which I could time in seconds. I cut some strips of X-Ray film and put them in a dark slide, then did a couple of test shots, one at the exposure I expected and one with more exposure. The second one gave me the kind of negative I was after, so I cut a piece of film to the full 5×4 size and exposed it. I took it into the darkroom and processed it in a tray of paper developer for a minute and a half, gave it a quick stop and fix, then washed it. The negative looked much softer in the background than it looked on the focusing screen (this is something I’ve noticed a lot) and I thought it would make a nice print. Then I remembered that somewhere in my studio I had a 150mm f2.8 projector lens which gave really nice out of focus softness, probably better than this one I’d just shot, so I thought I’d expose a second shot through it and compare them.

I had a faint idea that I’d read somewhere that two lenses with the same focal length and aperture should produce the same depth of field, so I was interested to see if it was so. After shooting and processing the second sheet of film through the projector lens, I could see immediately that they were quite different. The projector lens had a much shallower focus and was far softer in the out of focus areas, so I must have misremembered the thing about comparable focal lengths.
Anyway, I present the two images here for comparison.

Screen Shot 2015-01-14 at 18.42.54 Screen Shot 2015-01-14 at 18.42.17

Screen Shot 2015-01-14 at 18.42.02  Screen Shot 2015-01-14 at 18.41.45

If you have enjoyed this post and the information here and elsewhere on my blog, would you consider a small donation via Ko-fi please? You can send as little as £3.00, or more if you are feeling generous. This money goes towards materials used for the tests and printing for these articles. The link is; Ko-fi.com/andrewsandersonphotography

2 Comments

  1. Keith

Posted 21/11/2014 at 7:22 am

This makes me want to get my old MPP Mk VIII out of the box and take some still-life.
I only have a 150mm Xenar lens though.

  1. Thomas Binsfeld

Posted 27/11/2014 at 5:38 pm

Could you give some advice how to attach the lens to the camera and e.g. which lens to which camera?
Kind regards,
Thomas

Making use of old paper

Over many years I have bought, swopped and had given a wide range of darkroom papers. Some are rather old and not really much good for making quality prints, but they still have their uses. I don’t throw out old papers, I’ve found that they can be used for Photograms, Paper Negatives, or just for creative experimentation. I have one box of very old Ilford single weight paper which has a base colour like it has been soaked in tea. If you choose the right kind of negative for it, the paper is gorgeous, but it is no good for certain other types of shot. If you want a punchy image with clean whites, -forget it, but for a still life or a portrait I think it brings a nice quality.

Screen Shot 2015-01-14 at 18.07.15

Some of my favourite papers are lacking in contrast, that is to say, they have a lower grade now than the number on the box would suggest, this is because papers lose contrast with age. Not all though, -some last a long time, and I have examples from the sixties which are still ok. But some other papers are losing contrast at a much quicker rate, for instance, after only seven years. I have up to date papers which I use if I want a full range of tones, but the older ones are used if I want something different.  The flat, low contrast can impart a mood to the image, especially if the print is toned, in fact, I would say that this is essential. An untoned print of low contrast can look to be just a lot of greys, but a slightly sepia toned, or Selenium toned print is a different matter.

Recently I have been using some Ilfobrom Grade 4  for paper negatives in the 10×8 camera. I think it dates from the early seventies and has a contrast now of about grade 1, which is perfect for paper negatives. Here are three from yesterday morning in the mist.

Screen Shot 2015-01-14 at 21.48.42

Screen Shot 2015-01-14 at 21.51.18

Screen Shot 2015-01-14 at 21.51.39

And here is Winnie, patiently waiting for me while I set up and shoot.

Screen Shot 2015-01-14 at 22.04.00

So don’t throw those old papers away, try them as photograms or paper negatives. Try overprinting them and bleaching the highlights back (perhaps I’ll do this for the next post). Whatever you do, don’t just waste paper, if you really don’t think you can use it, send it to me -I’ll find a use for it.

7 Comments

  1. Thomas

Posted 14/03/2014 at 9:44 am

I am happy that I have got some Kentona yet. Unfortunately it is only 10×12.
But I do not have very old papers like you because I never did buy in bulk. Nor do I buy old papers on ebay. Should I try this? And what sort of papers?
I would like to have greater format of Kentona but all stock is emptied.
Thomas

2. Andrew Sanderson

Posted 14/03/2014 at 1:02 pm

Kentona is a lovely paper for prints, even now, but it is also excellent for paper negatives! So you will have to decide which is the best way to use it.

3. Andrew

Posted 14/03/2014 at 5:32 pm

Your point about low-contrast paper being good for paper negatives is brilliant! Why hadn’t I thought of that…

Andrew

4. Cahit

Posted 04/05/2014 at 6:35 pm

I have a bunch of expired papers. Is there a way to overcome printing whites as grays? Or more clear classification of alternative/creative uses of expired papers. (For example: type of scenes or negatives to print for better results)
Thanks

5. Mark Peeters

Posted 03/11/2014 at 1:22 am

I have a whole bunch of graded paper that came with a bunch of dark room equipment. but I only have multigrade developer from Ilford, can you develop graded paper with the multigrade developer?

Thanks

6. Andrew Sanderson

Posted 08/01/2015 at 10:17 pm

Dear Mark, please excuse my very late reply to your question on Thewebdarkroom. You can use Multigrade developer for graded paper without any problem.
Regards, Andrew Sanderson.

7.Andrew Sanderson

Posted 08/01/2015 at 10:24 pm

Dear Cahit, If you are using old papers to make prints, you may have problems with greyed whites. This could be a problem if you are expecting whites, but if you window matt the image and frame it, you could find that it looks really interesting as a new way to print.
If you are making paper negatives from the paper the greyed whites are not too much of a problem. You just print them using a higher contrast grade.
Regards, Andrew.

Back to gum printing

I’ve been promising myself for a while that I would get back to doing some gum printing. For one reason or another it hasn’t happened, though I have written articles on the subject on a number of occasions, -but for those I have used existing prints, done quite a bit ago.

Screen Shot 2015-01-14 at 21.31.48

Screen Shot 2015-01-14 at 21.32.49

In October, I was in conversation with a friend; Maxwell Doig, who is a very good painter. I was at his house and he had an old gum print of mine framed on the wall in his studio. It was so old I had totally forgotten doing it, but it was nice to see it from the viewpoint of a newcomer. We got into conversation about the process and Max encouraged me to do more with it. I had intended to get right onto it, but only got as far as pre shrinking the paper until yesterday when I made gum prints all day. It was a real treat to get back into it again and having so much uninterrupted time meant that I could fully concentrate on it. Gum printing is quite a slow, labour intensive process, but it is very rewarding. It requires the image to be printed more than once to give depth to the tones, and the images shown here have all had four separate coatings and exposures.

Screen Shot 2015-01-14 at 21.33.05

The greatest difficulty in the process is devising some way of getting your negative back in registration with the image for the second, third, or fourth exposure. Even though I had pre shrunk the paper by soaking it in alternate hot and cold trays of water, it still altered size enough to ruin a number of prints.

If you fancy having a go at it, there are many videos on Youtube, but they don’t give you much information about the finer points. I will put a PDF copy of a recent article in Dropbox here, for those who wish to read more on it.


6 Comments

  1. Oscar Carlsson

Posted 07/01/2014 at 7:37 pm

I really like that last image, it is very tender and carefully treated.

  1. wayne

Posted 11/01/2014 at 4:23 pm

The gumprint of the dog and girl is stunning

  1. Thomas Binsfeld

Posted 05/03/2014 at 1:43 pm

The technique fits to the image of the trees shown very good. I like it very much.
I am interested in alternative processes but only have experience in lith-printing.
Often my own images are too sharp, too much like a photo, but I do not know how to alter this.
I have seen some cyanotypes and like those too.
The reason I do not comment often is, because english is not my mother tongue.
I am usually only reading, but this time I pushed the comment button
Regards,
Thomas

  1. Chris

Posted 13/03/2014 at 3:39 pm

Love these pictures. Will have to give it a go once my darkroom is built. Thanks for posting these.

  1. Vanessa Marsh

Posted 20/03/2014 at 10:08 pm |

I am a photographer working in Oakland, CA and just came across your blog and website in my research on paper negatives. Thank you for providing this wonderful resource!

  1. Bob

Posted 28/06/2014 at 6:08 pm

A good rag paper hardly moves but even the cheapest watercolour paper can be tamed by saturating the BACK of the paper with water using a brush. The important thing happening here is that the size WON’T WASH OUT, and with a good well sized rag paper and the useful amount of preshrinking you should have very little problem with reregistering.

View Camera Magazine

I was recently contacted by a writer / photographer in the USA asking if I would like to be included in an article in View Camera Magazine. The article is on photographers using unusual film types, such as duplicating film and X-Ray. I have been shooting on X-Ray film since 1988 and have written a number of articles on the subject, but was surprised and flattered to be asked.

The article is called Alternative Films, Extraordinary results. and is in the July/August 2013 issue.

It is also mentioned on the esc4p.org blog, -resources page

Screen Shot 2015-01-14 at 17.48.27

Kirk Toft

It’s not very often that I do a post on another photographer, but recently I had a visit from an old friend who I don’t see often enough, and who’s work I think deserves more attention. Kirk is a photographer who has devoted himself to one process and knows it inside out, he also has a really good eye for a classic composition.

He visited recently to give me a large format camera which he was planning to throw out. I said I’d be happy to give it a good home and have been using it a lot recently, so I’d like to say thanks again Kirk! His generosity is not the reason for this write up though. I genuinely think he deserves more attention. He showed me a selection of his oil transfer prints and they were really gorgeous. I managed to prise one from his grip and I’ll be getting it framed soon.

Screen Shot 2015-01-14 at 20.57.33

Seeing this image here you get no sense of how subtle the tonality is and how the ink sits in the fibres of the paper. Oil transfer is a lovely process, -as are many of the alt processes when they are done well. These prints take a long time to make, and Kirk only produces them for a few months each year, when the humidity and temperature in his house are favourable. Each one is a special object.

One Comment

  1. Andrea Ingram

Posted 14/12/2012 at 10:21 am

What a lovely image. And such lovely work on the interweb too.
I have been wrestling somewhat unsuccessfully with this process recently. Coating paper with gelatine – only to have it fall off again. Now resorting to fixed fb paper! How humid should it be to do such things? It’s always damp here next to the sea!
Look forward to an online tutorial!
regards
A
Greetings for the season.

Making large copy negatives for alt processes

When I need to produce a Gum print or a Cyanotype, I sometimes use large format original negatives. More often than not I use copynegs made from an RC print as this gives me much more control and flexibility.

The first thing I do is make an RC print to the size that I need my final gum print to be, with all the burning in and dodging that the image requires. I then place that face down on a sheet of either; Lith film, Line film, Ortho film, X-ray film or medical Subtraction film (All of these have different properties, ISOs and contrast, so stick to one and understand how to get the best from it. I would suggest using Ilford Ortho film as it is easy to obtain and works really well). This is placed in a contact printing frame or under thick glass and exposed under the enlarger. An exposure is given and the film is developed for around 1 minute in paper developer under red safelight (shorter times give lower contrast, -longer times give more contrast). Stop and fix as usual. A 5 minute wash in running water is adequate for these types of film. Be aware though that x-ray film has a very soft emulsion and is easily damaged.

To begin with, make a few negatives of varying contrast and density, then when you have become more proficient, you will have an idea which kind of negative works best for the process you are using. I prefer to make two negatives when Gum printing, as this gives me better separation in the tones.

Screen Shot 2015-01-14 at 20.52.32

The advantages of this method are that you can make a large negative from any size original, you can get the contrast exactly right for your process and you don’t have to worry about damaging your negative when working with the alt process. I also prefer having a large border around my copy negatives, as this gives a better margin for attaching masking tape when re-aligning for multiple printing.

2 Comments

  1. Clive France

Posted 30/07/2013 at 10:37 am

Thanks for the excellent advice. Before I start, I just want to check that Aristo Ortho Litho film can be developed in normal paper developer. Freestyle suggests “for high contrast negatives, use this film with Arista A&B Lith developer or any standard lith developer.”

  1. sandy

Posted 24/09/2013 at 11:53 am

Dear Clive, I have not used Arista, but I expect it will behave in a similar manner to the others I have experience of. If you are wanting a longer tonal range, Ilford Multigrade, or similar paper developer will give you this if used at half strength. Experiment with different dev times to get the contrast you require.
Regards, Andrew.