
Philips PCS 130 color/black-white enlarger and Philips PCS 150 control unit.

The Philips PCS 130 is a very underrated enlarger. If you are a fan of split grade printing, but have not quite got your head round it, this enlarger will make it really simple for you. Launched in 1979, this enlarger was aimed at the home colour printing enthusiast. Their Tri-One colour system, being additive (red, green, blue), rather than subtractive filtration (cyan, magenta, yellow), was said to be more precise and to offer better colour saturation.
The enlarger can take negatives from 35mm, up to 6×7 cm, though the correct condensers and negative masks might not be easy to locate.
Now that colour is almost totally in the digital domain, these enlargers are no longer used for colour printing. Many enlargers with colour heads are employed by black and white printers to make split grade prints, however, subtractive filtration is often confusing and differs from one manufacturer to another. This particular control unit, having red, green and blue lights, each controlled separately, is perfect for split grade printing.
For those of you who are new to Multigrade papers and filtration, I need to give you a bit of information about the paper; In the old days, papers came in fixed grades, that is to say they had a fixed contrast and this was given as a number on the box. Grade 2 was normal contrast and was designed for printing a properly exposed and processed
negative. Lower grades were for contrasty negatives, and higher grades were for flat negs, or underexposed negs.
Multigrade paper was designed with two layers (actually three, but these two are the most important). One layer is sensitive to blue light, and gives a high contrast image, the other layer is sensitive to green light and gives a low contrast image. The Multigrade filters are subtractive, they take out some, or all of their opposite colour. The same thing happens with enlargers with colour heads using dial-in filtration. The dedicated Multigrade enlarger heads work with blue and green lights and this is what the Philips has. The beauty of this control unit is that each lamp can be switched on or off individually. The red light does not affect the paper, but it is useful when focusing, because all three lights combine to give white light.
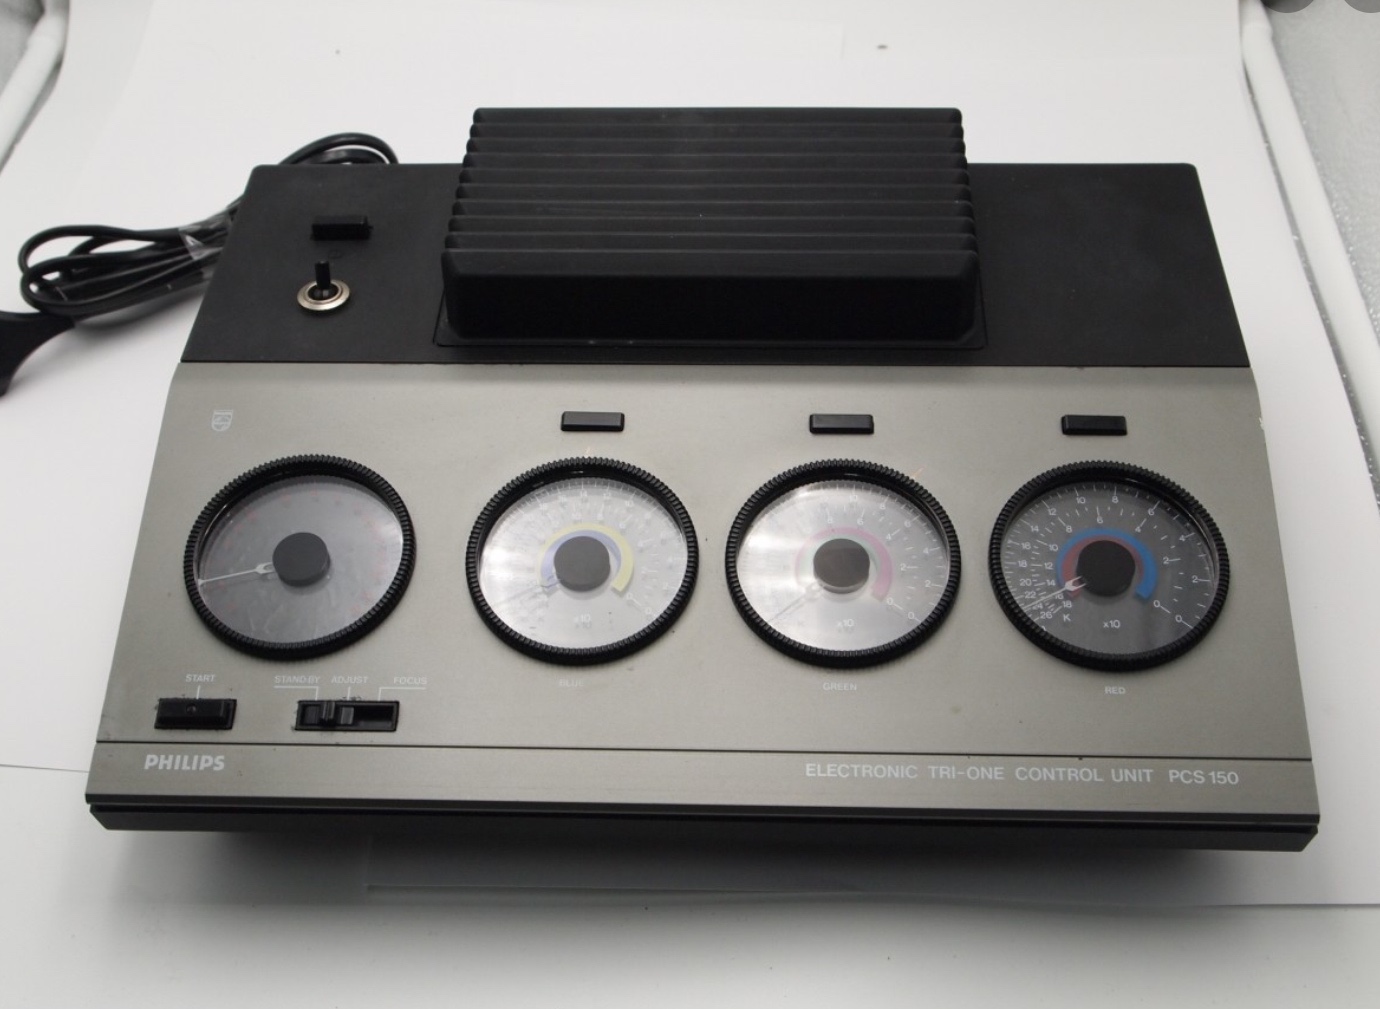
This is the control unit for the three lamps, with the timer on the left. The black buttons above the dials turn each lamp on or off individually.
Okay, are you all with me so far? This bit is quite simple, but when I discovered it, it was a game changer. Split grade printing had never been easier.
A negative is in the enlarger, the focus is done, the lens is a couple of stops down and you are ready to do a test strip. Find an area of the image where you have thin or empty parts of the neg, -the shadows. Now look for an area of density which represents the highlights. Can you place your test strip so that it spans both areas? This is where the test needs to go. Do the test exposure with all three lamps on full power.
Now the direction that you move your card as you do the individual exposures, should provide a bit of both extremes of tone on each strip that you expose. Each exposure on the test strip should tell you what is happening in shadow and highlight areas.
When the test is processed and in the fix, lift it out to check the result. Count along and see where the black first appears (the shadows). What exposure was that? Write it down and put a B next to it. Look at the test again and count along to see where the tone in the highlights looks correct. Write that number down and put a G next to it.
Put a full sheet of paper in the masking frame/easel. Turn all of the lamps to off. Set your timer to the time you wrote for B, and expose your paper with just the blue lamp turned on. Now set the timer for the G time, and expose your paper with just the green lamp. Process the paper and check the print, it should be pretty damn close to correct. This is split grade printing with one test strip!
I often do extra work on an image after this stage, but that is an individual choice, you may prefer a straight print. Nevertheless, this method, with this enlarger, saves a lot of time and testing. I don’t check the auction sites for enlargers because I have four different types in my darkroom and I don’t need any more. I have no idea how often these enlargers come up for sale, but I’m willing to bet that they don’t fetch high prices, because most people don’t realise how good they are.
If anyone reading this has a spare one, please leave a comment below, because I am sure that somebody reading this will want one.
I wish you well with your printing.
If you have enjoyed this post and the information here and elsewhere on my blog, would you consider a small donation via Ko-fi please? You can send as little as £3.00, or more if you are feeling generous. This money goes towards materials used for the tests and printing for these articles. The link is; Ko-fi.com/andrewsandersonphotography

Not sure I understand the single test strip. What colour light is used? I normally use two test strips one each for hard and soft filters. Perhaps and example?
LikeLike
Hi Douglas, I use all three lights at once to do the test strip. I then read the first appearance of black as the blue exposure, and detail in the whites as the green exposure.
The next time I am in the darkroom I will do a few example pictures and add them to the post.
LikeLike
It looks like a great enlarger Andrew and one I would consider buying if I didn’t already have my Durst.
Off topic, have you tried Ilford’s Ortho-Plus film in 35mm or 120 yet? I am interested in seeing how it compares to the likes of FP4 & HP5 for aesthetic/pictorial reasons.
Keep on writing your excellent articles.
LikeLike
Dear Keith, thanks for your comments. I have been using Ortho film off and on since 1978, and Ilford have had it in their catalogue for many years in 5×4 and 10×8 sheet film sizes. I’ve not had time to test the roll and 35mm products yet, I’m assuming that it is the same emulsion, though 80 ASA is higher than I would rate it. I have written a blog post on my experiences so far, but I won’t publish it until I have had chance to try the new version.
Regards, Andrew.
LikeLike
Thanks Andrew, I look forward to that.
Keith.
LikeLike
Thank you Andrew for the review.
I am new to film printing and if anyone knowns where I can buy one from please post a Link. It’s quite exhausting browsing for enlargers .
LikeLike
A guy has just offered me one, but it’s probably too late now. I don’t check these messages often enough.
Regards, Andrew.
LikeLike
let me know. maye i can afford a back up enlarger-. tyvm
LikeLike
Sorry but the enlarger I previously offered has gone now.
LikeLike
Hi Chris, I let him know at the time but he didn’t follow it up. I was just marking comments as read today ( rather late).
LikeLike
thank you for the reply let me know more, i can always do with a back up enlarger if i can afford it. Thank you Andrew
LikeLike
Interesting article.
I have a retrieved a Philips PCS130 enlarger from my loft which I will be happy to give to somebody interested in using it.
There is also a Philips PDC112 timer that connects to it.
It all looks in good condition.
If anybody is interested, then please let me know.
It will need to be collected though; I live in Stockport (Greater Manchester)
LikeLike
Thanks Chris. I have a friend who might be interested, I’ll let him know.
Regards, Andrew.
LikeLike
Thanks Andrew. Will see how we go. I also have some film developing tanks (Durst) also available if he is interested.
LikeLike
The article about the Phillips PCS 130 and the PCS150 was very informative and inspiring.
I have a Phillips PCS 2500 enlarger and the PCS 150 which I have struggled to use successfully.
After many unsuccessful efforts to work out how to use this combination I swapped this with the accompanying black and white substitute. This swap improved my printing immediately, but inspired by your article I recently swapped back to give your method for split grade printing a go.
My initial results were pleasing, but I still encountered one of the problems I had originally- a very dark image on the baseboard, even with the enlarging lens opened wide and a long exposure time for small prints (7×5)
How do I overcome this dark image and consequently long exposure times.?
The MR11 35watt halogen lamps don’t seem to project enough light to illuminate the baseboard. My negatives on the whole are reasonably well exposed and developed.
How can I overcome this problem?
LikeLike
Hi Richard, Your image shouldn’t be dim when printing as small as 7×5. There is a thick green glass in the head of the enlarger, it’s there to dissipate heat, but it can be removed. I took mine out 35 years ago and have never had a problem. You shouldn’t have heat problems unless you leave the enlarger on (which I don’t think you should do). This should give you a little more light. Another thng could be a dirty mirror in the head?
Other than that, I can’t think what to suggest.
Are you only stopping the lens down two stops from open? and are you printing on a particularly slow paper, such as Forte?
Regards, Andrew.
LikeLike
Thanks for your swift response Andrew. I think the thick green glass was removed by the previous owner. I have used that space to hold below the lens filters whilst using the traditional black and white bulb/condenser system using a150 watt bulb. This has worked really well for me. The mirror seemed clean enough but I will double check that next.
I thought I might fit 50watt M11bulbs to see if that helps. I would love to go further with the colour head as I love the idea of simplifying the split contrast printing.
If that doesn’t work I can always replace the colour head with the 150 watt bulb.
Cheers
Richard
LikeLike
Andrew I forgot to add details of my paper. I use Ilford multi grade (glossy)MGIV and I always close the lens down two stops. Except in this particular instance I was printing wide open.
I have since starting this conversation tried another (less dense) neg and have had better results with the print easel illumination and the test strip has loads of detail.
Although I have been generally pleased by my film exposure/dev process, which has been reliably consistent in the past I might need to reappraise my negative exposure and development times.
Do you think I’d better think it out again?
LikeLike
Hi Richard, I hadn’t thought about negative density, of course that is an important factor.If you could send me a phone shot of a strip of negatives held up I could give you a rough assessment. andrewsandersonphoto@talktalk.net
LikeLike
Thank you Andrew that’s really good of you. I’ll try that
Cheers Richard
LikeLike
I have just bought one of these enlargers as non-working, but haven’t got it home yet. I was going to convert it into a copy stand, but it is much bigger than expected. I also have the control unit, but that was listed as not working either
LikeLike
Hi Geoff, the control unit might just need the electrical contacts cleaning. The start button on mine was sometimes iffy.
LikeLike
Those enlargers are currently selling for about £120 on *bay. The equivalent Phillips enlarger without a colour head is my one and only enlarger, and I am very happy with it (I rarely do split-grade printing). The only modification I found necessary was to fasten the bottom of the column to the workbench (i.e. discard the baseboard) and fix its top to the wall using a length of threaded rod and some nuts. This was the only way I could get the negative precisely parallel to the baseboard at higher positions (60cm and upwards). I have examined other makes of enlarger and come to the conclusion that this is actually a common problem but often unrecognised. I wouldn’t advise removing the heat-blocking glass, because you will get negatives popping out of focus if you use the carrier glassless – which is the better option because the glass provided for that carrier causes Newton rings, and anyway adds 4 extra surfaces for dust!
LikeLike
Heiland tells me they could still make PCS 130 modules for their Splitgrade System. The Philips lamps for this device are rather expensive, but there are cheaper 35W MR11 GU4 lamps available, might be even LEDs would work. I have this enlarger in good condition without a controller and would sell if anyone is interested.
LikeLike
Dear Marcel, I don’t know of anyone who is looking for one just now.
Regards, Andrew.
LikeLike
Andrew, thank you for this, I knew nothing about the Philips PCS130. Happily I’ve managed to source a couple over here in France. I’m all set, only thing missing is 6x6cm negative mask. Thanks again.
LikeLike
John, there were also different condenser sets for 35mm and 6×6. Needless to say the latter are much less common, but they are about.
LikeLike
Thank you, your article helped me make a purchase decision.
I just got the PCS130/150 in excellent condition and it’s going to get some use this weekend. I have only developed/enlarged in a communal darkroom once so this will be my first time in my own space. Should be interesting.
LikeLike
I was inspired by this article, and have just bought a PCS-130 + 150 combo! I’m not quite understanding your test-strip procedure, which seems key to getting this split-grade trick to work. Can you explain it to a newcomer in more detail? This is my first enlarger.
LikeLike
Hi there, I’m pleased you have managed to find one.
Make sure all three lights are on with the individual buttons above the dials, make sure all dials are at full power and turn the enlarger on and off with the power button.
My timer has a bad connection so I don’t use it, I time things by listening to a metronome and counting in my head.
Focus with the lens on the brightness setting (fully open aperture), then close the lens down two stops. Put a small bit of paper under the enlarger then do a series of five second exposures.
Your test should, after processing, show a pale strip and a dark strip at the other end, but somewhere in there are the correct exposures for shadows and highlights. If they are on the same exposure you don’t need to split grade, just do a print at that time.
If your correct blacks come in before your correct highlights you need different exposures through the green and blue lamps.
Where black appears iid your blue light exposure and where your highlights look correct is your green light exposure.
Give it a try and see how it turns out.
Kind regards, Andrew.
LikeLike